Frequently asked questions

Our FAQ (frequently asked questions) about our products, assembly, maintenance, our technical choices, choosing your SPCK, SPCE…  drivetrain.

How to choose your AllYoogs® drivetrain?

Product SPCK.Kit SPCX.Kit Teeth.Less SPCE.Kit

Public

Children <45kg up to “Expert XL” frame

Children up to “Expert XL” frame

All riders

All riders from PRO frame upwards

Chain

SPCK (Small Pitch Chain)

SPCE (Small Pitch Chain)

11/128 & 3/32 – Standard Chains

SPCE (Small Pitch Chain)

Chainring

SPCK

SPCX

Teeth Less

SPCE

Cog

SPCK

SPCX

Teeth Less

SPCE

Tools

SPCK

SPCE

SPCE

Chain tensioner

SPCK *

SPCX *

Universal with spring*

SPCE / Chain guide

Tracks

European


No European

* not mandatory

FAQ about our products

The AllYoogs® SPCK / SPCE chain

  • Since the pitch is smaller on the SPCK/SPCE chain, grease mixed with dust or mud could clog it.
  • It is recommended to use a dry PTFE lubricant instead of conventional grease.
  • Before application, thoroughly degrease the chain using gasoline or brake cleaner.
  • Apply the lubricant every 2 to 3 weeks.
  • When conditions are wet or muddy, clean using water only.
PTFE dry lubricant - SPCK drivetrain kit
PTFE dry lubricant - SPCK kit
BCS-400 Dry Lubricant - SPCE Drivetrain Kit
BCS-400 Dry Lubricant - SPCE Kit

  • Position the two ends of the chain facing each other.
  • Pass the link from the outside towards the inside of the bike in the 2 strands of the chain.
  • Place the 2 mobile plates on the link on the inside of the bike.
  • Using a small screwdriver, place the bulding side of the clip at the front, in the direction of the chain's movement.
Direction of the quick link
SPCK quick link installed

With the SPCE tensioner, we recommend riveting the chain.

It is possible to use a quick link until the end of use of the SPCE chain guide (maximum category U17).

  • Position the two ends of the chain facing each other.
  • Pass the link from the outside toward the inside of the bike in the 2 strands of the chain.
  • Place the mobile plate on the link on the inside of the bike.
  • Using a small screwdriver, place the bulding side of the clip at the front, in the direction of the chain's movement.
Direction of the quick link
SPCK quick link installed

Removing the Chain Rivet

  • Insert the chain correctly into the chain breaker tool, ensuring it is firmly positioned at the base of the tool.
  • Use the small pin to loosen the rivet until it is almost completely removed.
  • Use the large pin to push the axel out completely and separate the links.
  • Be careful not to lose the axel, as it is essential for reassembly.
  • Make sure to use each pin according to its specific function to avoid damage.
  • Always check that the pin is perfectly aligned with the chain axis. Improper positioning could weaken the tool and lead to breakage.

Reassembling the Chain

  • Position the chain breaker tool so that the screw is perfectly aligned with the chain rivet.
  • Gradually tighten the screw towards the rivet.
  • Tighten gently until you feel resistance, then make one final full turn before loosening the chain breaker tool.

Removing the Chain Rivet

    • Insert the chain correctly into the chain breaker tool, holding it firmly against the bottom of the tool.
    • Use the pin to loosen the rivet until it is almost completely removed and separate the links.
  • Be careful not to lose the axel, as it is essential for reassembly.
  • Always check that the pin is perfectly aligned with the chain axis. Incorrect positioning could weaken the tool and lead to breakage.

Reassembling the Chain

  • Position the chain breaker tool so that the screw is perfectly aligned with the chain rivet.
  • Gradually tighten the screw against the rivet.
  • Tighten gently until you feel resistance, then make one final full turn before loosening the chain breaker tool.
  • Once the rivet is in place, you can peen the end using a punch (3.97 mm = 5/32").

How to choose your SPCK chainring and cog ?

How to choose your child's gear ratio ?

SPCK development tables

In the table below, find the value indicated at the intersection of the front sprocket and the cog of your child.

Example: cog = 16 and front sprocket = 37. The value to take into account = 376,3

CLASSIC FRONT SPROCKET 4-bolt 104 mm - 20 x 1.1/8 TYRE
REAR SPROCKET323334353637
38
39404142434445
18289,3298,3307,4316,4325,5334,5343,6352,6361,6370,7379,7388,8397,8 406,8
17306,3315,9325,5335,0344,6354,2363,8373,3382,9
392,5402,0411,6421,2 430,8
16325,5335,6345,8356,0
366,2376,3386,5396,7406,8417,0427,2437,3447,5457,7
15347,2358,0368,9379,7390,6401,4412,3423,1434,0444,8455,7

To obtain the SPCK equivalence :

In the table, find the values closest to those in the table above (higher values). The value to be taken into account is the one with the smallest cog.

Example with 376,3: the closest values are 378 and 379,7. The smallest cog is 30, so the choice is a 30 cog with a 70 front sprocket.

AllYoogsSPCK FRONT SPROCKET 4-bolt 104mm - 20 x 1.1/8 TYRE
SPCK REAR SPROCKET67686970717273
34320,7325,5330,3335,0339,8344,6349,4
33330,4335,3340,3345,2350,1355,1360,0
32340,7345,8350,9356,0361,1366,2371,2
31351,7357,0362,2
367,5372,7
378,0383,2
30363,4368,9374,3
379,7385,1390,6396,0
29376,0381,6387,2
392,8398,4404,0409,6
28389,4395,2401,0406,8412,6418,5424,3

In the table below, find the value indicated at the intersection of the front sprocket and the cog of your child.

Example: rear sprocket = 16 and front sprocket = 40. The value to take into account = 421

CLASSIC FRONT SPROCKET 4-bolt 104 mm - 20 x 1.3/8 TYRE
REAR SPROCKET323334353637
38
39404142434445
18299,4308.7318.1327.4336.8346.1355.5364.8374.2383.6392.9402.3411.6421,0
17317.0326.9336.8346.7356.6366.5376.4386.3396.2406.1416.0425.9435.8445,7
16336.8347.3357.8368.4378.9389.4399.9410.4421.0431.5442.0452,5463,1473,6
15359.2370.5381.7392.9404.1415.4426.6437.8449,0460,3471,5

To obtain the SPCK equivalence :

In the table, find the values closest to those in the table above (higher values). The value to be taken into account is the one with the smallest cog.

Example with 421: the closest values are 423,9 and 424,1. The smallest cog is 27, so the choice is a 27 SPCK stainless steel cog with a 68 front sprocket.
Be careful with the 27 sprocket, the SPCK chain tensioner is highly recommended.

AllYoogsSPCK FRONT SPROCKET 4-bolt 104mm - 20 x 1.3/8 TYRE
SPCK REAR SPROCKET67686970717273
34331.8336.8341.7346.7351.6356.6361.5
33341.9347.0352.1357.2362.3367.4372.5
32352.6357.8363.1368.4373.6378.9384.1
31363.9369.4374.8380.2385.7391.1396.5
30376.1381.7387.3392.9398.5404.1409.7
29389.0394.8400.7406.5412.3418.1423.9
28402.9408.9415.0421.0427.0433.0439.0

In the table below, find the value indicated at the intersection of the front and the rear sprockets of your child.

Example: rear sprocket = 17 and front sprocket = 40. The value to take into account = 382,9

CLASSIC FRONT SPROCKET 5-bolt 110 mm - 20 x 1.1/8 TYRE
REAR SPROCKET323334353637
38
39404142434445
18289,3298,3307,4316,4325,5334,5343,6352,6361,6370,7379,7388,8397,8 406,8
17306,3315,9325,5335,0344,6354,2363,8373,3382,9
392,5402,0411,6421,2 430,8
16325,5335,6345,8356,0
366,2376,3386,5396,7406,8417,0427,2437,3447,5457,7
15347,2358,0368,9379,7390,6401,4412,3423,1434,0444,8455,7

To obtain the SPCK equivalence :

In the table, find the values closest to those in the table above (higher values). The value to be taken into account is the one with the smallest cog.

Example with 382,9 : the closest values are : 383,2 and 385,1. The smallest cog is 30, so the choice is a 30 cog with a 71 front sprocket.

AllYoogsSPCK FRONT SPROCKET 5-bolt 110mm - 20 x 1.1/8 TYRE
SPCK REAR SPROCKET70717273
35325.5330.1334.8339.4
34335.0339.8344.6349.4
33345.2350.1355.1360.0
32356.0361.1366.2371.2
31367.5372.7378.0
383.2
30379.7385.1390.6
396.0
29392.8398.4404.0
409.6
28406.8412.6418.5424.3

In the table below, find the value indicated at the intersection of your child’s front sprocket and cog.

Example : cog = 18 and front sprocket = 41. The value to take into account = 383,6

CLASSIC FRONT SPROCKET 5-bolt 110 mm - 20 x 1.3/8 TYRE
REAR SPROCKET323334353637
38
39404142434445
18299,4308.7318.1327.4336.8346.1355.5364.8374.2383.6392.9402.3411.6421,0
17317.0326.9336.8346.7356.6366.5376.4386.3396.2406.1416.0425.9435.8445,7
16336.8347.3357.8368.4378.9389.4399.9410.4421.0431.5442.0452,5463,1473,6
15359.2370.5381.7392.9404.1415.4426.6437.8449,0460,3471,5

To obtain the SPCK equivalence :

In the table, find the values closest to those in the table above (higher values). The value to be taken into account is the one with the smallest gear.

Example with 383,6 : the closest values are : 384,1 and 385,7 The smallest rear sprocket is 31, so the choice is a 31 cog with a 71 front sprocket.

AllYoogsSPCK REAR SPROCKET 5-bolt 110 mm - 20 x 1.3/8 TYRE
REAR SPROCKET70717273
35336.8341.6346.4351.2
34346.7351.6356.6361.5
33357.2362.3367.4372.5
32368.4373.6378.9384.1
31380.2385.7391.1396.5
30392.9398.5404.1409.7
29406.5412.3418.1423.9
28421.0427.0433.0439.0

How to choose your SPCX chainring and cog ?

How to choose your child's gear ratio ?

SPCX development tables

In the table below, find the value indicated at the intersection of the chainring and the cog of your child.

Example: cog = 16 and chainring = 37. The value to take into account = 376,3

CLASSIC FRONT SPROCKET 4-bolt 104 mm - 20 x 1.1/8 TYRE
REAR SPROCKET323334353637
38
39404142434445
18289,3298,3307,4316,4325,5334,5343,6352,6361,6370,7379,7388,8397,8 406,8
17306,3315,9325,5335,0344,6354,2363,8373,3382,9
392,5402,0411,6421,2 430,8
16325,5335,6345,8356,0
366,2376,3386,5396,7406,8417,0427,2437,3447,5457,7
15347,2358,0368,9379,7390,6401,4412,3423,1434,0444,8455,7

To obtain the SPCX equivalence :

In the table, find the values closest to those in the table above (same or higher values). The value to be taken into account is the one with the smallest cog.

Example with 376,3: the closest values are 376,3 and 378,0. So the choice is a 31 cog with a 72 chainring.

AllYoogsSPCX FRONT SPROCKET 4-bolt 104mm - 20 x 1.1/8 TYRE
SPCX REAR SPROCKET71727374757677
32361,1366,2371,2376,3381,4386,5391,6
31372,7378,0383,2388,5393,7399,0404,2
30385,1390,6396,0401,4406,8412,3417,7
29398,4404,0409,6415,3420,9426,5432,1
28412,6418,5424,3430,1435,9441,7447,5

In the table below, find the value indicated at the intersection of the chainring and the cog of your child.

Example: cog = 16 and chainring = 40. The value to take into account = 421,0

CLASSIC FRONT SPROCKET 4-bolt 104 mm - 20 x 1.3/8 TYRE
REAR SPROCKET323334353637
38
39404142434445
18299,4308.7318.1327.4336.8346.1355.5364.8374.2383.6392.9402.3411.6421,0
17317.0326.9336.8346.7356.6366.5376.4386.3396.2406.1416.0425.9435.8445,7
16336.8347.3357.8368.4378.9389.4399.9410.4421.0431.5442.0452,5463,1473,6
15359.2370.5381.7392.9404.1415.4426.6437.8449,0460,3471,5

To obtain the SPCX equivalence :

In the table, find the values closest to those in the table above (same or higher values). The value to be taken into account is the one with the smallest cog.

Example with 421,0: the closest values are 421,0 and 423,9. So the choice is a 29 cog with a 73 chainring.

AllYoogsSPCX FRONT SPROCKET 4-bolt 104mm - 20 x 1.3/8 TYRE
SPCX REAR SPROCKET71727374757677
32373,6378,9384,1389,4394,7399,9405,2
31385,7391,1396,5402,0407,4412,8418,3
30398,5404,1409,7415,4421,0426,6432,2
29412,3418,1423,9429,7435,5441,3447,1
28427,0433,0439,0445,0451,0457,1463,1

How to choose your Teeth Less chainring and cog ?

Special features

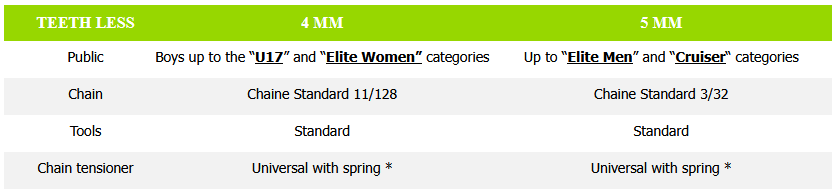
Teeth Less 4 mm 5 mm
Public

Boys up to the “U17” and “Elite Women” categories

Up to “Elite Men” and “Cruiser“ categories

Chain

Chaine Standard 11/128

Chaine Standard 3/32

Tools

Standard

Standard

Chain tensioner

Universal with spring *

Universal with spring *

How to choose your SPCE chainring and cog ?

In the table below, find the value indicated at the intersection of the front sprocket and the rear sprockets.

For example: rear sprocket = 16 and front sprocket = 42. The value to be taken into account = 442.0

CLASSIC FRONT SPROCKET 4-bolt 104 mm - 20 x 1.3/8 TYRE
REAR SPROCKET404142434445
18374.2383.6392.9402.3411.6421,0
17396.2406.1416.0425.9435.8445,7
16421.0431.5442.0452,5463,1473,6
15449,0460,3471,5

To obtain the SPCE equivalence :

In the table, find the value that is closest to the one found in the table above (equal or greater value).

Example with 442.0 : we advise you to use a 30 rear sprocket with a 79 front sprocket.

AllYoogsSPCE FRONT SPROCKET 4-bolt 104mm - 20 x 1.3/8 TYRE
SPCE REAR SPROCKET757677787980
30421,0426,6432,2437,8443,4449,0

In the table below, find the value indicated at the intersection of the front sprocket and the rear sprockets.

For example : - rear sprocket = 16 and front sprocket = 45. The value to be taken into account = 436.3
- rear sprocket = 17 and front sprocket = 49. The value take into account = 447,1

CLASSIC FRONT SPROCKET 4-bolt 104 mm - 20 x 1.6 TYRE
REAR SPROCKET40414243444546474849505152
18344,7353,3361,9370,6379,2387,8396,4405,0413,6422,3430,9439,5448,1
17365,0374,1383,2392,4401,5410,6419,7428,9438,0447,1456,2465,4474,5
16387,8397,5407,2416,9426,6436,3446,0455,7465,4475,0484,7494,4504,1
15413,6424,0434,3444,7455,0465,4475,7486,0496,4506,7517,1527,4537,7

To obtain the SPCE equivalence :

In the table, find the value that is closest to the one found in the table above (equal or greater value).

Example with 436,3 : we advise you to use a 28 rear sprocket with a 79 front sprocket.
447,1 :  we advise you to use a 28 rear sprocket with an 81 front sprocket.

AllYoogsSPCE FRONT SPROCKET 4-bolt 104 mm - 20 x 1.6 TYRE
SPCE REAR SPROCKET7576777879808182838485
30387,8393,0398,1403,3408,5413,6418,8424,0429,2434,3349,5
28415,5421,0426,6432,1437,7443,2448,7454,3459,8465,4470,9

Overall summary of the conversion table.

Reference calculation: (SPCE front sprocket ÷ SPCE cog) x 16 = standard front sprocket

Development = distance covered in cm by the rear wheel during one pedal turn

SUMMARY STANDARD/SPCE conversion table - 20 x 1.6 TYRE
Development387,8393,0398,1403,3408,5413,6415,5418,8421,0424,0426,6
Front sprocket40,0040,5341,0741,6042,1342,6742,8643,2043,4343,7344,00
Rear sprocket1616161616161616161616
SPCE Front sprocket7576777879807581768277
SPCE Rear sprocket3030303030302830283028
Development429,2432,1434,3437,7439,5443,2448,7454,3459,8465,4470,9
Front sprocket44,2744,5744,8045,1445,3345,7146,2946,8647,4348,0048,57
Rear sprocket1616161616161616161616
SPCE Front sprocket8378847985808182838485
SPCE Rear sprocket3028302830282828282828

In the table below, find the value indicated at the intersection of the front sprocket and the rear sprockets.

For example : – rear sprocket = 16 and front sprocket = 44. The value to be taken into account = 437.2
– rear sprocket = 17 and front sprocket = 47. The value take into account = 439.5

CLASSIC FRONT SPROCKET 4-bolt 104 mm - 20 x 1.75 TYRE
REAR SPROCKET40414243444546474849505152
18353,3362,1370,9379,7388,6397,4406,2415,1423,9432,7441,6450,4459,2
17374,0383,4392,7402,1411,4420,8430,1439,5448,8458,2467,5476,9486,2
16397,4407,3417,3427,2437,2447,1457,0467,0476,9486,8496,8506,7516,6
15423,9434,5445,1455,7466,3476,9487,5498,1508,7519,3529,9540,5551,1

To obtain the SPCE equivalence :

In the table, find the value that is closest to the one found in the table above (equal or greater value).

Example with 437.2 : we advise you to use a 28 rear sprocket with a 77 front sprocket.
439,5 : we advise you to use a 30 rear sprocket with an 83 front sprocket.

AllYoogsSPCE FRONT SPROCKET 4-bolt 104 mm - 20 x 1.75 TYRE
SPCE REAR SPROCKET7576777879808182838485
30397,4402,7408,0413,3418,6423,9429,2434,5439,8445,1450,4
28425,8431,5437,2442,8448,5454,2459,9465,5471,2476,9482,6

Summary of the conversion table.

Reference calculation: (SPCE front sprocket ÷ SPCE cog) x 16 = standard front sprocket

Development = distance covered in cm by the rear wheel during one pedal turn

SUMMARY STANDARD/SPCE conversion table - 20 x 1.75 TYRE
Development397,4402,7408,0413,3418,6423,9425,8429,2431,5434,5437,2
Front sprocket40,0040,5341,0741,6042,1342,6742,8643,2043,4343,7344,00
Rear sprocket1616161616161616161616
SPCE Front sprocket7576777879807581768277
SPCE Rear sprocket3030303030302830283028
Development439,8442,8445,1448,5450,4454,2459,9465,5471,2476,9482,6
Front sprocket44,2744,5744,8045,1445,3345,7146,2946,8647,4348,0048,57
Rear sprocket1616161616161616161616
SPCE Front sprocket8378847985808182838485
SPCE Rear sprocket3028302830282828282828

How to choose your SPCE Cruiser chainring and cog ?

To obtain the SPCE equivalence :

The value at the intersection in the tables corresponds to the standard chainring :

– with a 17T cog (table 1)
– with an 18T cog (table 2)

SPCE CHAINRING for CRUISER IN 17-T COG
REAR SPROCKET6768697071
3037,9738,5339,1039,6740,23
2840,6841,2941,8942,5043,11
SPCE CHAINRING for CRUISER IN 18-T COG
REAR SPROCKET6768697071
3040,2040,8041,4042,0042,60
2843,0743,7144,3645,0045,64

AllYoogs® BMX Chain tensioners

SPCK Chain tensioner Universal Chain tensioner SPCE Chain guide* SPCE Chain tensioner* tensioner with spring

Chain tension

   Hard point absorption   .

Sprocket change

Options

10 / 15 / 20 mm

10 / 15 / 20 mm

10 / 15 / 20 mm

10 / 15 / 20 mm

10 / 15 / 20 mm

Mounting

between the frame

and the wheel

between the frame

and the wheel

between the frame

and the wheel

between the frame

and the wheel

between the frame

and the wheel

Riders category

children

children

up to “U17” 

all categories

all categories

Chain

SPCK chain

quick link/rivet

standard chain

quick link/rivet

SPCE chain

quick link/rivet

SPCE chain

riveting required

standard chain

quick link/rivet

ℹ️ Important: * The use of one of these two products is mandatory for the operation of our SPCE chain.

Our universal chain tensioner allows you to quickly change a minimum of 3 front sprockets without changing the rear base (+1 to -1).

SPCK/Universal Chain tensioner exploded view - AllYoogs
  • Remove the wheel bolt or axle on the drivetrain side to insert the tensioner between the hub and the frame
  • Once the tensioner is fitted, retighten the bolt or axle slightly.
  • Loosen the stop screws slightly so that they are free.
  • Setting :
    • Fit the largest of your front sprockets
    • Position the chain, keeping it level with the chainring.
    • the stop screws (2,3,5) must not touch the ends of the slide rail. Adjust the chain length if necessary.
    •  Pass the chain over the tensioner cog to determine a maximum chain length.
Chain tensioner - upper position - Drivetrain BMX Race - AllYoogs
Chain tensioner - upper position
    • Remove the large chainring and replace it with smaller one. Pass the chain under the tensioner cog to determine the minimum chain length.
Chain tensioner lower position - Drivetrain BMX Race - AllYoogs
Chain tensioner - lower position
    •  ⇒  These last 2 steps determine the optimum chain length to exploit the full range of tensioner adjustment.
  • Cut the chain to the defined length, and fit the desired chainring.
  • Tilt the tensioner to adjust the tension
  • Once tensioned, tighten the stop screws (2) against the frame to block the rotation of the tensioner.
Tensioning of the stopper bolts - AllYoogs chain tensioner - BMX Race
  • Tighten the bolt or wheel axle
  • Turn the crankset to check the chain tension.
  • Repeat if necessary.
  • Turn the crankset to check that the tensioner cog is properly aligned with the drivetrain cog
  • If this is not the case, you can adjust the alignment by sliding the tensioner cog on the 2 standoffs (6).
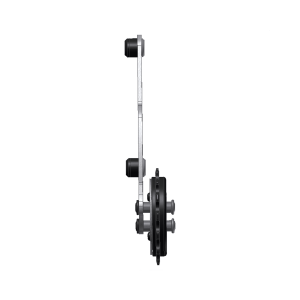
Universal chain tensioner - profile view

Our SPCK chain tensioner allows you to quickly change a minimum of 5 front sprockets without changing the rear base (+2 to -2).

SPCK/Universal Chain tensioner exploded view - AllYoogs
  • Remove the wheel bolt or axle on the drivetrain side to insert the tensioner between the hub and the frame
  • Once the tensioner is installed, retighten the bolt or axle slightly.
  • Slightly loosen the stop screws so that they are free.
  • Setting :
    • Fit the largest of your front sprockets
    • Position the chain, keeping it level with the chainring.
    • ⚠ the stop screws (2,3,5) must not touch the ends of the slide rail. Adjust chain length if necessary.
    •  Pass the chain over the tensioner cog to determine a maximum chain length.
Chain tensioner - upper position - Drivetrain BMX Race - AllYoogs
Chain tensioner - upper position
    • Remove large chainring and replace with smaller one. Pass the chain under the tensioner cog to determine minimum chain length.
Chain tensioner lower position - Drivetrain BMX Race - AllYoogs
Chain tensioner - lower position
    •  ⇒  These last 2 steps determine the optimum chain length to exploit the full range of tensioner adjustment.
  • Cut the chain to the defined length, and fit the desired chainring.
  • Tilt the tensioner to adjust the tension
  • Once tensioned, tighten the stop screws (2) against the frame to block the rotation of the tensioner.
Tensioning of the stopper bolts - AllYoogs chain tensioner - BMX Race
  • Tighten bolt or wheel axle
  • Rotate crankset to check the chain tension.
  • Repeat if necessary.
  • Turn the crankset to ensure that the tensioner cog is properly aligned with the drivetrain cog
  • If this is not the case, you can adjust the alignment by sliding the tensioner cog on the 2 standoffs (6).
Universal chain tensioner - profile view
  • In case of power transmission problems (crackling, noise on start-up), the tensioner cog should be tangent to the drivetrain cog. In this case, adjust the position of the cog on the tensioner support (4) by placing the screws (1) in the corresponding holes (see illustration below), and place the chain above the tensioner cog (photo 1).
SPCK Chain tensioner adjustment - Drivetrain BMX Race - AllYoogs
SPCK Chain tensioner adjustment


Our universal chain tensioner with spring allows quick changeover of ± 3 chainrings without changing the rear base (+1 to -1 or more, depending on the frame).

SPCE Chain tensioner - exploded view - AllYoogs
SPCE Chain tensioner - exploded view
  • The universal chain tensioner with spring is designed for chain line ranging from 43 mm to 46 mm. It is therefore necessary to adjust the cog and the chainring to these values, if necessary by fitting shim washers on the crankset or freewheel body. It comes with a 44 mm setting (standard BMX Race).
    Please note that the AllYoogs/Prophecy/Beringer combination requires a 2mm washer on the drivetrain side (supplied with the Beringer crankset).
  • Once the chain line has been made, it is necessary to adjust the alignment of the tensioner on the cog.
Alignment of tensioner sprocket and drivetrain rear sprocket
  • With the wheel removed, place the tensioner on the hub (in its housing) to check alignment. This is important to minimize friction.
  • The shim washers (16,17,27) have different thicknesses (1 / 0.5 / 0.2 mm) to ensure a perfect fit. Unscrew screws (18) to gain access.
  • By swapping the washers (16,17,27) on either side of the tensioner sprocket (11) / tensioning arm (20) / spring (14) assembly, you can adjust the chain line.
     Don't lose the washers (28): none should be removed, as they also serve to guide the tensioning arm (20).
Lateral adjustment of tensioner sprocket for alignment
  • Once the tensioner has been installed, reassemble the rear wheel, inserting the tensioner between the hub and the frame.
  • Slightly tighten screws or wheel axle. The tensioner should pivot freely forwards or backwards.
  • Loosen stop screw (2) if necessary.
  • Position wheel where required
  • Adjustment to determine optimum chain length:
    • Mount the largest of your front sprockets
    • Position the chain, keeping it level with the chainring.
    • With the spring released (14), rotate the tensioner to tension the chain. It is then tilted forward. The stop screw (2,25,31) must not touch the end of the slide rail. Adjust chain length if necessary.
    • Remove the large front sprocket, replace it with the smaller one and repeat the operation.
    • When tensioning the chain, the support must not exceed 90° from the ground. If the tensioner is located towards the rear, place the jockey wheel (24) on the lower part of the tensioning arm (20). To do this, loosen the screw (26), taking care not to lose the washer (21). Place the grooved nut (5) on the lower hole and reassemble the tensioner assembly (24,21,26).
    • Re-tension the chain to check the position of the tensioner.
  • Cut chain to length, fit chainring and quick-link.
  •  With the spring unhooked, tip the tensioner backwards to adjust the initial tension, and the spring will complete the tension. It's best to tension the chain on the hard point.
Universal chain tensioner with spring - view quart AR - BMX Race - AllYoogs
  •  Once the chain is taut, tighten the screws or wheel axle.
  •  Staple the spring and turn the crankset to ensure correct operation. Rotation should be free of mechanical noise. If this is not the case, one of the above operations hasn't been carried out correctly.
  • Adjust the chain tension using the different notches on the spring.

Our universal chain tensioner with spring allows quick changeover of ± 5 chainrings without changing the rear base (+2 to -2 or more, depending on the frame).

SPCE Chain tensioner - exploded view - AllYoogs
SPCE Chain tensioner - exploded view
  • To transmit full power, the large tensioner sprocket (11) must be tangent to the drivetrain sprocket. Adjust the position of the large sprocket (11) on the tensioner support (4) by placing screws (29 and 30) in the corresponding holes (see diagram below). Supplied with a 30 cog adjustment.
    ⚠ When handling, be careful not to lose the lock washers (28) clamped between the support (4) and the standoffs (6).

SPCE/Cruiser Chain tensioner adjustment - BMX Race Drivetrain - AllYoogs
  • The SPCE chain tensioner is designed for chain line ranging from 43 mm to 46 mm. It is therefore necessary to adjust the cog and the chainring to these values, if necessary by fitting shim washers on the crankset or freewheel body. It comes with a 44 mm setting (standard BMX Race).
    Please note that the AllYoogs/Prophecy/Beringer combination requires a 2mm washer on the drivetrain side (supplied with the Beringer crankset).
  • Once the chain line has been made, it is necessary to adjust the alignment of the tensioner on the cog.
Alignment of tensioner sprocket and drivetrain rear sprocket
  • With the wheel removed, place the tensioner on the hub (in its housing) to check alignment. This is important to minimize friction.
  • The shim washers (16,17,27) have different thicknesses (1 / 0.5 / 0.2 mm) to ensure a perfect fit. Unscrew screws (18) to gain access.
  • By swapping the washers (16,17,27) on either side of the tensioner sprocket (11) / tensioning arm (20) / spring (14) assembly, you can adjust the chain line.
    ⚠ Don't lose the washers (28): none should be removed, as they also serve to guide the tensioning arm (20).
Lateral adjustment of tensioner sprocket for alignment
  • Once the tensioner has been installed, reassemble the rear wheel, inserting the tensioner between the hub and the frame.
  • Slightly tighten screws or wheel axle. The tensioner should pivot freely forwards or backwards.
  • Loosen stop screw (2) if necessary.
  • Position wheel where required
  • Adjustment to determine optimum chain length:
    • Mount the largest of your front sprockets
    • Position the chain, keeping it level with the chainring.
    • With the spring released (14), rotate the tensioner to tension the chain. It is then tilted forward. ⚠ The stop screw (2,25,31) must not touch the end of the slide rail. Adjust chain length if necessary.
    • Remove the large front sprocket, replace it with the smaller one and repeat the operation.
    • When tensioning the chain, the support must not exceed 90° from the ground. If the tensioner is located towards the rear, place the jockey wheel (24) on the lower part of the tensioning arm (20). To do this, loosen the screw (26), taking care not to lose the washer (21). Place the grooved nut (5) on the lower hole and reassemble the tensioner assembly (24,21,26).
    • Re-tension the chain to check the position of the tensioner.
  • Cut chain to length, fit chainring and quick-link.
  •  With the spring unhooked, tip the tensioner backwards to adjust the initial tension, and the spring will complete the tension. It's best to tension the chain on the hard point.
Universal chain tensioner with spring - view quart AR - BMX Race - AllYoogs
  •  Once the chain is taut, tighten the screws or wheel axle.
  •  Staple the spring and turn the crankset to ensure correct operation. Rotation should be free of mechanical noise. If this is not the case, one of the above operations hasn't been carried out correctly.
  • Adjust the chain tension using the different notches on the spring.

FAQ about the transport

The Transport

 Unofficial translation, the French text alone being authoritative.

Attention

Any anomaly concerning the delivery (damage, missing product compared to the delivery order, damaged package, broken products…) must be indicated on the delivery note in the form of “handwritten reserves”, accompanied by the customer’s signature.

The buyer is required to check the condition of the package and the number of packages delivered in the presence of the delivery person. In case of doubt, the buyer is obliged to refuse the parcel and to report these incidents to AllYoogs.

If all products are in stock :

  • Orders placed before 12:00 am (local time) with tracked mail, Chronopost and Colissimo am leave the same day.
  • Orders placed after 12:00 am (local time) with tracked mail, Chronopost and Colissimo leave the next day (D+1).
  • Orders placed with Mondial Relay leave the next day (D+1).

Exceptions:

Orders placed on Fridays after 12:00 am (local time) leave on the following Monday.
Orders placed the day before a public holiday leave on the first working day.

The delivery times communicated by the carriers are given as an indication in working days and don’t engage the responsibility of AllYoogs in case of possible delays.

This doesn’t take into account possible delays due to customs formalities and customs blockages (shipments outside Europe).

If one or more products are on pre-order :

The principle is that an order is always shipped in one go. We therefore wait until all the products are available and physically in stock before sending your order.

So if your order contains available products and products on pre-order. It will be shipped when we receive the stock of the pre-ordered product. The date or period is indicated on the page of the item in question.

Unofficial translation, the French text alone being authoritative.

What means DAP incoterms ?

Delivery At Place

As a seller, with when we send with the Incoterms DAP, we will have to :

– Organize and pay transportation costs to the destination agreed with the buyer.
– Clear customs on export goods. Don’t worry, the carriers offered on Allyoogs.com will take care of it.

When sending DAP, the buyer must:

– Take care of import customs clearance. Even if the carriers offered by AllYoogs.com carry out customs clearance, sometimes the customs of the destination country ask the recipient for additional information.
– Pay customs fees and taxes.

In a way, it is like buying a good in his country, because the customs fees he will have to pay are mainly VAT and application fees.

Who pays the customs fees with the Incoterms DAP?

Customs import duties are entirely at the expense of the recipient.

Unofficial translation, the French text alone being authoritative.

Terms of returns and exchange

The CUSTOMER must, without undue delay and, in any event, no later than fourteen (14) days after communication of his decision to withdraw, return the goods to: 683 rue de l’Abrivado 30132 Caissargues (France).
This period is deemed to have been respected if the CLIENT returns the goods before the expiry of the fourteen-day period.

Return costs

The CUSTOMER shall bear the direct costs of returning the goods.

Condition of the returned good

The PRODUCT must be returned according to the SELLER’s instructions and include all the accessories delivered.

The CLIENT shall only be liable for the depreciation of the good resulting from handling other than that necessary to establish the nature, characteristics and proper functioning of the PRODUCT. In other words, the CLIENT may test the PRODUCT, but may be held liable for any manipulations other than those necessary.

Packaging

The PRODUCTS are packaged in accordance with current transport standards, in order to ensure maximum protection for the PRODUCTS during DELIVERY. CLIENTS must comply with the same standards when returning PRODUCTS. Therefore, the CLIENT is invited to return the PRODUCT that does not suit him/her in its original packaging and in good condition, suitable for resale.